
はてなのブログカードは自サイトでも別ウィンドウで開きます。別に気にしなくてもいいんじゃないのと思いながらもついつい深入りしてしまい、node.js でサーバーを立ち上げてブログカードを返すことはできないかとやってみましたらできました。
01関連記事と考え方
関連記事
考え方
まず、クライアントからブログカードにしたいサイトアドレスをクエリパラメータにして node.js サーバーを呼びます。
サーバー側では、
- URLパースしてクエリパラメータを取り出し、
- 取り出したURLに対して、cheerio-httpcli を使ってウェブスクレイピングし OGPデータを取得し、
(注) ogp-parser を使ったほうが簡単かも知れない(後日確認) - ブログカード用に HTMLコーディングして返す
ということでいけると思います。
cheerio-httpcli
Node.jsでWEBページのスクレイピングを行う際に必要となる文字コードの変換と、cheerioによってパースしたHTMLをjQueryのように操作できるHTTPクライアントモジュールです。
インストールは、
$ npm install cheerio-httpcli
なんですが、Cannot find module 'cheerio-httpcli' のエラーがでてかなり手間取りました。Windows, Ubuntu ともに同じエラーがでたのですが、あれこれやっているうちに解消してしまい、原因はつかめていません。
02localhost & heroku 用ブログカード作成アプリ
で、ネットでの情報を参考にしながら見よう見まねで localhost でのチェック用と heroku 用に書いたコードがこちら。素人くさいような気がしますが動いてはいます。
app.js
const http = require('http');
const server = http.createServer();
const urlParser = require('url');
const fs = require('fs');
const client = require('cheerio-httpcli');


var parseOgp = function( url ){
  var p = client.fetch( url );
  return new Promise(function (resolve, reject) {
    p.then( function( result ){
      var og = {};
      og.url = result.$("meta[property='og:url']").attr("content");
      og.title = result.$("meta[property='og:title']").attr("content");
      og.desc = result.$("meta[property='og:description']").attr("content");
      og.img = result.$("meta[property='og:image']").attr("content");
      og.site = result.$("meta[property='og:site_name']").attr("content");
      resolve(og);
    })
    p.catch(function( error ){
      reject( error );
    });
  });
}


server.on('request', function(req, res){

  switch(req.url){
    case '/favicon.ico':
      break;
    case '/style.css':
      try{
        var data = fs.readFileSync('./style.css', 'utf-8');
        res.writeHead(200, {'Content-Type' : 'text/css'});
        res.write(data);
        res.end();
      }catch(error){
        console.log(error);
        res.end();
      }
      break;
    default:
      var u = urlParser.parse(req.url, true).query.url;
      if(!/^https?:\/\/.+/.test(u)){
        res.end();
        return;
      }


      parseOgp(u).then(function(result){
        fs.readFile('./index.html', 'utf-8', function(err, data){


          var rhost = (req.headers.referer !== undefined) ? req.headers.referer.split('/')[2] : '';
          var qhost = u.split('/')[2];
          var target = (rhost === qhost) ? '_top' : '_blank';
          var desc = result.desc.substr(0, 100) + '...';
          var replaced = data
            .replace(/@@url@@/g, result.url)
            .replace(/@@target@@/g, target)
            .replace(/@@title@@/g, result.title)
            .replace(/@@desc@@/g, desc)
            .replace(/@@img@@/g, result.img)
            .replace(/@@site@@/g, result.site);


          res.writeHead(200, {'Content-Type' : 'text/html'});
          res.write(replaced);
          res.end();
        });
      }).catch(function(error){
        fs.readFile('./error.html', 'utf-8', function(err, data){
          res.writeHead(200, {'Content-Type' : 'text/html'});
          res.write(data);
          res.end();
        });
      });
    }
});


server.listen(process.env.PORT || 8080);
console.log('Server running at http://localhost:8080/');
index.html
<!DOCTYPE html>
<html lang="ja">
<head>
    <meta charset="UTF-8">
    <title>Blogcard</title>
    <link rel="stylesheet" type="text/css" href="./style.css">
</head>
<body>
    <!-- @@title@@ -->
    <div class="wrapper">
        <div class="thumb-wrapper">
            <a href="@@url@@" target= "@@target@@" class="thumb-link"><img src="@@img@@" class="thumb"></a>
        </div>
        <p class="title">
            <a href="@@url@@" target= "@@target@@" class="title-link">@@title@@</a>
        </p>
        <p class="description">@@desc@@</p>
        <div class="footer">
            <p class="fav-wrap">
                <img src="http://favicon.hatena.ne.jp/?url=@@url@@" class="favicon" />
                @@site@@
                <img src="http://b.hatena.ne.jp/entry/image/@@url@@" class="hatebu">
            </p>
        </div>
    </div>
</body>
</html>
error.html
<!DOCTYPE html>
<html lang="ja">
<head>
    <meta charset="UTF-8">
    <title>Error Page</title>
    <link rel="stylesheet" type="text/css" href="./style.css">
</head>
<body>
    <div class="wrapper">
        <p title="title">Not Found</p>
        <p class="description">お探しのページは見つかりませんでした</p>
    </div>
</body>
</html>
style.css
*{
    margin: 0;
    padding: 0;
}
.wrapper{
    width: 100%;
    max-width: 500px;
    background: #fff;
    border: 1px solid #ccc;
    border-radius: 3px;
    box-sizing: border-box;
    padding: 12px;
}
.thumb-wrapper{
    width: 100px;
    height: 100px;
    float: right;
    margin: 0 0 10px 10px;
    padding: 0;
    position: relative;
    overflow: hidden;
}
.thumb-link {
    position: absolute;
    width: 1000%;
    left: 50%;
    margin: 0 0 0 -500%;
    text-align: center;
}
.thumb {
    width: auto;
    height: 100px;
}
.title-link {
    color: #333;
    font-weight: bold;
    text-decoration: none;
    font-size: 17px;
    line-height: 1.4;
}
a.title-link:hover{
    text-decoration: underline;
}
.description {
    color: #666;
    font-size: 12px;
    line-height: 1.5;
}
.footer {
    clear: both;
}
.fav-wrap {
    color: #999;
    margin: 5px 0 0 0;
    font-size: 12px;
}
.hatebu {
    margin: 0 0 0 5px;
    border: none;
    display: inline;
    vertical-align: middle;
}
03配置
これらのファイルを
プロジェクトディレクトリ
┣ node_modules/
┣ app.js
┣ index.html
┣ error.html
┗ style.css
と置いて、$ node app.js と打てばローカルでサーバーが立ち上がります。
ブログ側では、リンクや過去記事貼り付けなどで生成される iframe の src="https://hatenablog-parts.com/embed?url=**** を src="http://localhost:8080/?url=**** に変更します。
そうしますと、こんな感じでブログカードが出来上がります。
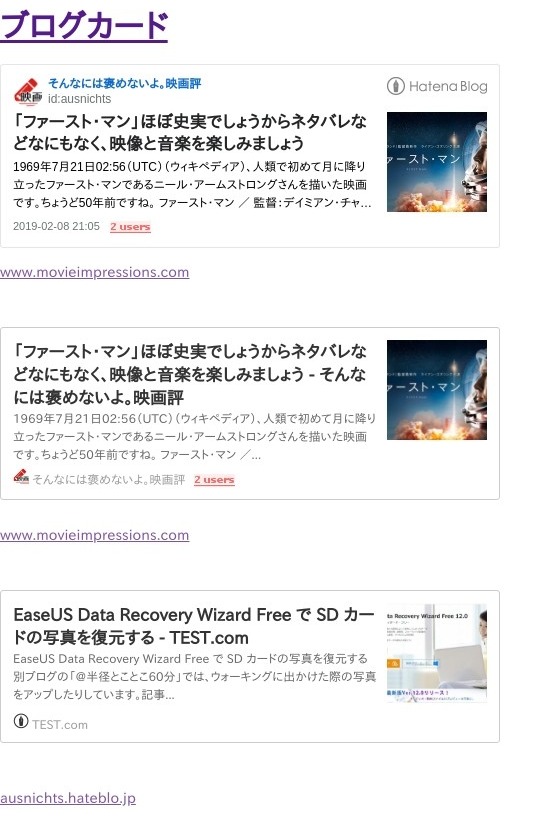
一番上が通常のブログカード、2つ目と3つ目がこのアプリで作成したブログカード、2つ目は他サイトですので別ウィンドウで開き、3つは(テスト用の)自サイトですので同じウィンドウで開きます。
これを heroku へデプロイすれば OGPデータを持っているサイトであれば同じようなブログカードになるはずです。
次はOGPデータを持っていないサイトへの対応や heroku へのデプロイをやってみます。